Tuesday, December 12, 2017

Creative Impressions Poinsettia Tags and card!

I was recently visiting the Creative Impressions warehouse and saw Janet, our creative owner, putting together some darling "poinsettias" using her Felt Blossoms, Leaves and some Yellow Thin Twine,  attaching them to some invoices going out to her customers. I quickly told Janet that was one of the cutest ideas I had seen recently and that I wanted to share her wonderful idea with all of you!  I went home and created lots more to put on tags.  Janet's were created using her Heritage Burgundy Felt Blossoms, but I decided to experiment with some white poinsettias and some Sheer Blossoms as well.  Here are the results:


Aren't they cute?  They were super fast and easy to create - just thread some Yellow Thin Twine through the hole of our smallest (and NEW) Yellow Buttons,  down the opposite button hole,  then thread both ends of the twine through the hole in the Red or White Blossom (then through a second blossom if using two), through the Felt or Sheer Leaf, and tie a knot on the opposite site of the leaf . Finally make a bow with the twine at the back.

Here is a photo of a variety of Blossoms and Leaves that, when mixed and matched, will give you a wonderful variety of poinsettia colors and textures:


To create a poinsettia tag, if using the same color twine for the tag, thread ends through hole in tag.  Otherwise, attach another color such as green or red to the tag and adhere poinsettia over the tag hole.


Need a quick, easy and fun Christmas card?  It's not too late as these cards are a "snap" to make!  All you need is some pretty paper, a scrap of white card stock, two poinsettias and some "Merry and Bright" Printed Twill Ribbon!


And there you have it!  I am set for tags now!  Give them a try - it's not too late to create lots before Christmas!

Susan


Friday, December 1, 2017

B Line Christmas Card Class at Artsy!

Hello everyone!  I would like to share some Christmas cards that I created for a class at Artsy Stamps and Paper Crafts in Loveland, Colorado.  It was a fabulous class!  I created four different cards for the students.

The first card was made using the Dream Catcher stamp HO145F:  I used Tumbled Glass and Broken China Distress Inks and applied them to a blank white card using a blending tool.  Then I stamped the Pine Tree Small HO103D in several places using Peeled Paint Distress Ink.  I created the snow mound from a scrap piece of white card stock, curving the top with the scissors as I went.  The snow mound was then adhered over the sky and trees.

The Dreamer Girl was stamped onto scrap card stock, colored and cut out.  I used foam tape to adhere her to the card after I stamped White Christmas HO123B to the snow mound of the stamp.  To finish the card I added a Creative Impressions white glimmer ribbon to the left side of the card panel and one of their snowflake brads between the girl's hands.  The panel was adhered to a white card.


The following card was created using the Pinecone Duo Stamp HO130G, one of my favorite stamps!
I stamped the pine cone onto a cream card stock panel, colored it with pencils and added a red micro brad from Creative Impressions to the center of the greens.  I then stamped Holiday Wishes HO205C below the pine cone, added color around the edges with Vintage Photo Distress Ink and a blending tool, adhered the panel to a larger brown panel with a Creative Impressions brown glimmer ribbon and a bow and then to a Bo Bunny dots evergreen panel.  Finally all was adhered to a white card.

Next up is a card using the Frosty stamp HO201G.  For this card I decided to use a pre-made Bo Bunny dots powder blue card panel.  I stamped Frosty twice, once on the dots panel and once on a white card stock panel.   By doing this I could cut out the Frosty image along the far tree line, cutting off the branches for his arm and the branch tree.  By lining up the two images, I didn't have to cut around the branches.  Easy!

Pencils were used to color the children's clothes.  The entire panel was adhered to a slightly larger black panel and finally a white card.  'Tis the Season HO139B was stamped in the lower right section of the card.


The last card I call the "Polar Express" for obvious reasons.  This card is so easy to create as there is no coloring at all except for some white pen accents for "snow"  I stamped Christmas Time HO138E first with black Archival ink.  I then stamped the Train TP119C below it to the left and finally Believe HO116C along the top of the Christmas Time sign.  

I created a small snow mound from a scrap of white card stock along with a snowflake from Creative Impressions using their different sized snowflakes and a glitter brad.  I used my white pen to draw in some snow and some Stickles to add glitter.  This panel was adhered to a larger black panel,  a Bo Bunny Dots paper and finally to a white card.


I hope you have enjoyed these cards and you will try making some of them for yourself.  As you can see, they were quite easy!

Susan

Tuesday, November 21, 2017

Creative Impressions and Artsy Stamps and Paper Crafts

Hello Everyone:

Today I would love to post about one of the wonderful stores here in Colorado that carries a fabulous selection of Creative Impressions Ribbons and Embellishments - Artsy Stamps and Paper Crafts! Artsy is located in Loveland, Colorado and carries a wide range of stamps, dies, inks, embellishments and papers.  It is one of my favorite local stores!


Patsy Kral is the owner of Artsy.  She started carrying Creative Impressions products last year and has added more Creative Impressions embellishments and ribbons as, according to Patsy, they have been "Wonderful sellers".


Patsy has laid out CI products in such a fabulous way.  Our Twill Expressions, Felt Shapes and Shaped Paper Fasteners are located within different "themed" areas.  Here are our Twills and Embellishments in the "Western/Southwest" themed area.


Creative Impressions has it's own area in the store as well.  Patsy has many ribbons and embellishments displayed with some sample cards that were made by yours truly:


All Creative Impressions' many colors of Crepe Ribbons are also displayed together:  You will also find a huge assortment of Gingham Ribbons.


The Leafy Vine and Double Dot Ribbons have also been big sellers.  Recently added were Creative Impressions Velvet Shimmer Ribbons.  Can you see the shimmer in them in this photo!  Gorgeous!


Finally, Patsy was one of the first Creative Impressions customers to add our new entire color collection of buttons!  Aren't they beautiful?  The colors are amazing.  I have found they go with absolutely everything I create!  This is just a sampling of the 20 fabulous colors!


I hope that you will stop and visit Artsy Stamps and Paper Crafts if you find yourself in the Loveland area of Colorado.  Patsy will help you find anything you need from her large inventory.  I'm sure she wouldn't mind shipping either!

Susan

Tuesday, November 14, 2017

"Thank Heavens for Little Girls!" (and Creative Impressions Buttons)

Hi Everyone!  I'm back from California where I was looking after my parents and back to blogging!

My husband and I have lots of little girls in the family and more are on their way!  One niece had a baby in July, another is due in three weeks and one is due in March of 2018!  Two neighbors are also having girls!  As you can imagine, I needed LOTS of baby girl cards. It was fun to finally sit down and create with some pretty cards using mostly Bo Bunny paper and fabulous Creative Impressions Embellishments, especially the new Buttons!


I have incorporated buttons into all the cards.  It was so easy as Creative Impressions has such a wide variety of fabulous button colors.  All I had to do was find a color to coordinate with my paper!  For this first card, I chose a large light pink button and two of the smallest Dark Umber Brown buttons.

l
I also used some Creative Impressions 1/2" Dot Pink with Cream Ribbon, layering  a 1/4" Single Stitched ribbon on top of the wider piece.  I then cut a piece of the "Cute as a Button" Twill Expressions and adhered it in the center of the previous layered ribbon.  Two small Dark Umber Brown Buttons were added on either side of the Twill.

I have had the darling little girl stamp for quite a while.  I wanted to see what it would look like to replace the balloon she was holding with a button - cuteness overload!  Love it!  One card finished!

Next I used some Bo Bunny patterned paper I had in my stash and again matched buttons to go with the paper.  For this card I stamped the baby's image in the center of a cut-out panel.  I colored the image with pencils and adhered the panel onto a piece of darker paper, then to a pink panel and finally white card stock.  Creative Impressions Soft Pink Mini Rick Rack looks so cute on the side edge of the card along with three Brown Buttons with bows made from CI Soft Pink/White Baker's Twine.  I like to make bows showing from the back of the buttons so that you can see the pretty colors of the buttons better.
I adhered a piece of "Cute As A Button" twill onto the paper panel and finally created a small bow from the Mini Rick Rack and adhered another Dark Umber Brown Button with a thin jute bow on the top.


I used the same stamped image on another paper panel from the same collection, colored it with pencils, added a piece of the Cute As a Button" Twill diagonally along the top and then a Mini Pink Button was placed at the bottom as the center of a flower.


Finally, I stamped a wonderful baby sentiment inside one last paper panel as well as a bear image on a scrap piece of white card stock.  This was super simple to make as I made some bows from Creative Impressions 1/8" Organdy Cream Ribbon with the loops to the back of the buttons and adhered the buttons to the "Roses" in the paper to act as flower centers.  I cut out the stamped bear and added it to the panel using foam tape.  Finally, I glued a Small Pink Button to the center of the bear.


I hope you like these sweet Baby Girl cards and make some of your own.  Even though the paper itself is pretty, these cards really come to life with some Creative Impressions Embellishments, especially those wonderful Buttons!

Susan

Wednesday, September 27, 2017

Bring on the Bling!

It's a rainy, gray day today and I need some light, so Bring on the Bling!

Two of my favorite products are Graphic 45 papers and Creative Impressions Embellishments!  I love purple and other jewel tones, so I automatically loved the Midnight Madness collection!  I thought I was making some fun cards, however, it wasn't until I added some Bling from Creative Impressions that my cards came alive!  Here they are:


The first card, a birthday card, started out like this:


It's still a nice card, but after some adding some Creative Impressions bling, it turned into this:


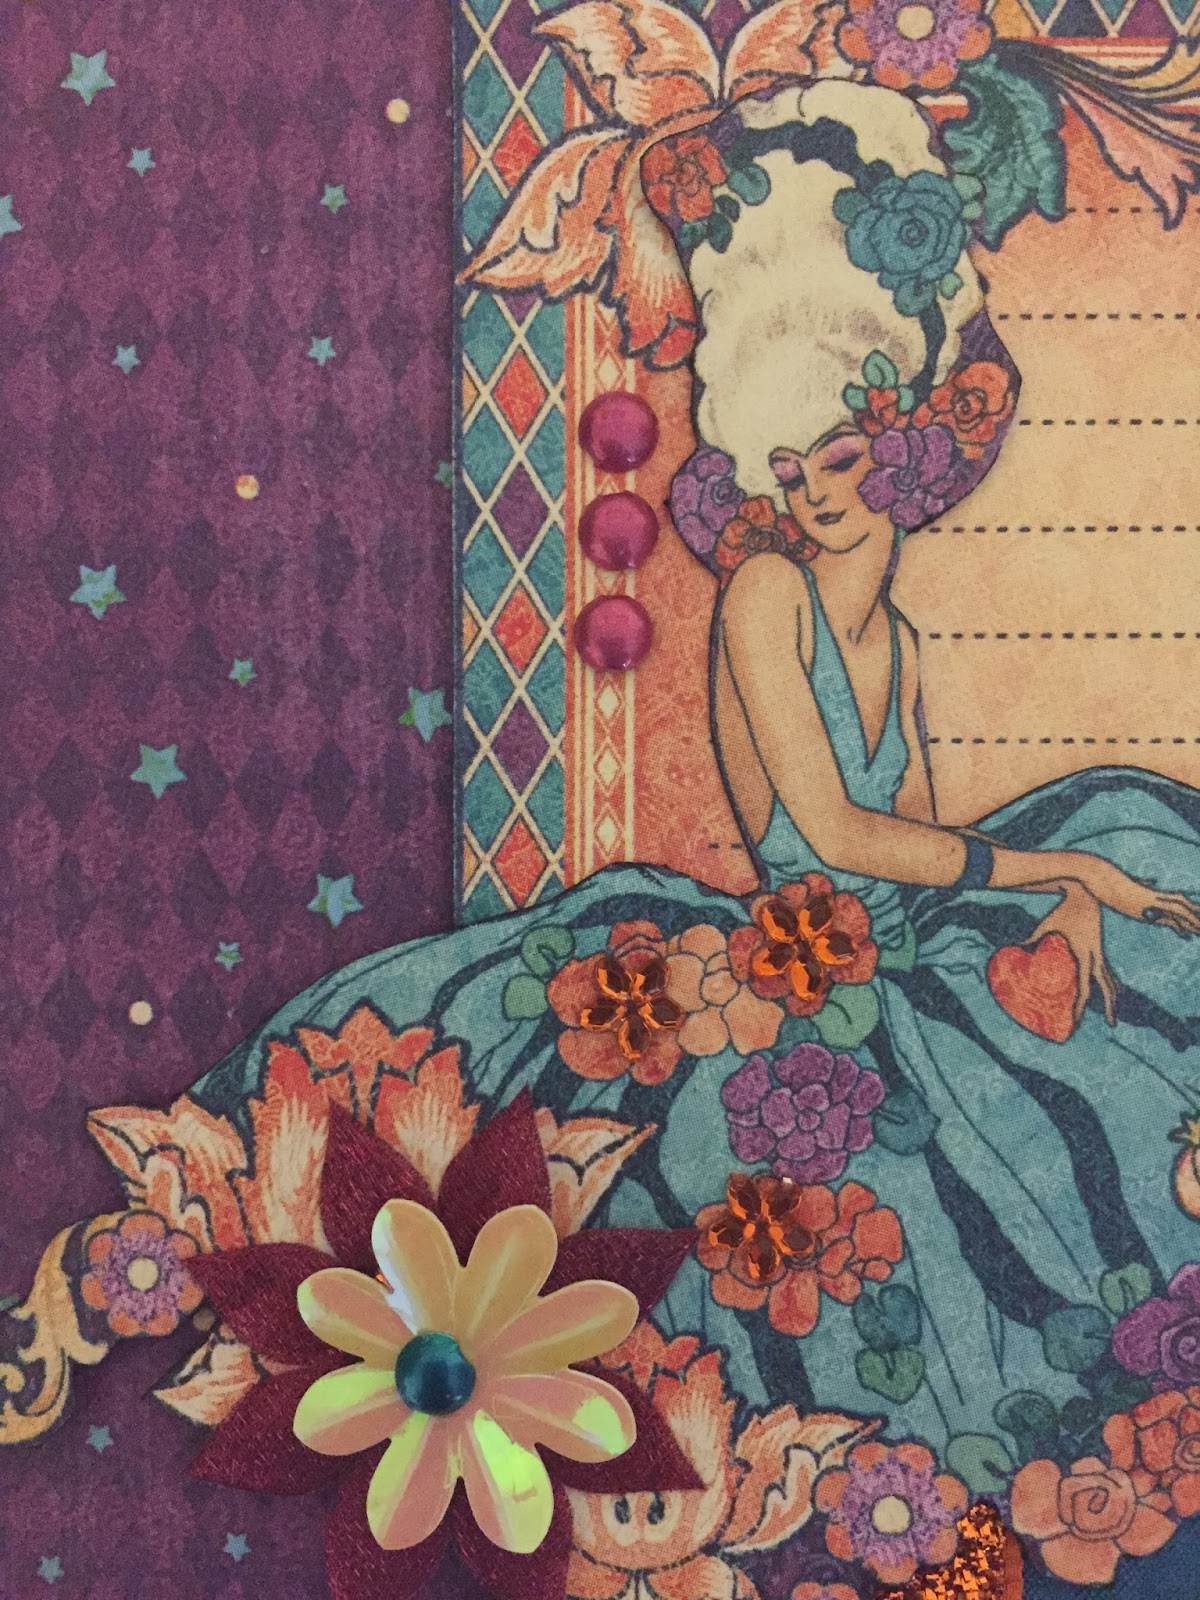
I started off by wrapping some 1 1/2" Teal Blue Crepe Ribbon around the card panel.  I then added some Orange Velvet Shimmer Ribbon over the top in the center - so far, so good!  I had previously cut out one of the beautiful ladies, so now I adhered her over and below one of the paper panels and slightly over the ribbon as well.  She still wasn't "blinged out" enough, so I added more CI embellishments.


I poked three small holes through the paper next to the lady and added three Magenta Mini Metallic Rounds (brads).  Bright Orange Flower Bling was then added over the orange flowers in the paper as well as a flower created with a Magenta Heritage Blossom and an Iridescent Tropical Yellow Blossom.  A Teal Mini Round was used to attach the Blossoms together.  Unfortunately I didn't get a close-up of the White pearls that adorn the centers of some of the small flowers in the paper.


Of course the word "Beautiful" is from the gorgeous Midnight Madness paper, but I wanted the card to be a Birthday card, so I computer generated the words "Happy" and Birthday and added them above and below the world "Beautiful".

I t think this second card will be a wedding card.  Here is the "before" picture:


Again, it is a lovely card.  However, here is it with some Creative Impressions Bling:


This time I used the gorgeous Orange 3/4" Crepe ribbon.  Doesn't it add a ton to this card?    As you can see I tied a bow to the right edge of the center panel and finished it off with a purple Bright Circle Bling.  I again added those fabulous Bright Orange Flower Bling to the center of the flowers (I cut out and added a third flower to the bottom of the card).  White Pearls were also added and the whole thing was finished off with some Purple Flower Bling in the man's robe.


Finally, the last card is actually a Pocket Gift card that opens to reveal a gift card and a sentiment.  Here is the front of the pocket card:


Again, this paper is gorgeous by itself.  However, the addition of Creative Impressions Blossoms and a Glimmer Round to create the flower really make this piece pop!

I hope you have enjoyed these cards and will give these a try yourself!  Not hard with Creative Impressions products!

Susan

Friday, September 22, 2017

Happy Fall Y'All!

Sorry, I couldn't resist using a Texan's term for "You All" for my latest blog entry! I love it!

I have been playing with paper scraps and Creative Impressions embellishments and came up with 4 more cards (check out Creative Impressions Facebook page for other cards) that I would like to share with you today on the first day of Fall:


 I really love Creative Impressions Fall Leaf brads (Oak and Maple leaves) and couldn't wait to create some cards with them.  I had multiple scraps leftover from Graphic 45's Time to Flourish collection as well as some Paper Studio Autumn paper, so I laid out what I had and hoped inspiration would come!  I am pretty happy with the results!

I created some similar cards this past February for a Valentine's theme using Creative Impressions embellishments and decided to use the same format more or less for my Autumn theme.  Here are some of the individual cards:


I had some pretty odd shaped scraps, but I think they all ended up working well together.  This card was made entirely from the G45 Time to Flourish paper.  I wish I had taken a "before" photo, but I'm sure you can imagine what this card looked like before I added the wonderful Maple leaf brads and Dark Brown Baker's Twine.  I think it stands out much better after the addition of the brads, don't you?

Here is another card using a combination of G45 and Paper Studio papers, but this time I used the Oak Leaf brads.


Finally, here are two more cards with a Paper Studio autumn paper in the background and small G45 panels in the front:


I stamped an elk image (Art Impressions) onto two G45 panels, adhered them to a brown panel, wrapped CI Light Brown Baker's Twine around two edges and added 3 Oak Leaf brads to finish the card.


For this card I again used two G45 paper panel and added both some Oak Leaf and Maple Leaf brads to each panel.  I also added some Creative Impressions Baker's Twine on two sides of the card as well as a leaf from the Fall Leaves Felt Assortment with an Oak leaf over the top.

I hope you will stop and take a look at the papers in your scrap bin and have fun creating some new cards or Mixed Media project.  Don't forget to look through your stash of Creative Impressions embellishments to add a cool touch and make those cards "pop"!

Susan


Wednesday, August 16, 2017

Playing with Creative Impressions Cork Paper

August 16, 2017

Playing with Creative Impressions Cork Paper!

Hello everyone!  Have any of you tried using Creative Impressions Cork Paper with your cards or mixed media projects?  I decided to do this recently and thought I would share the results with you!

First, I decided to stamp directly onto the cork paper.  I wasn't at all sure how the image would turn out, but I was quite happy with the results.  I used Ranger black archival ink and B-Line Design's Buffalo Bill Cody stamp.


I was pretty happy with this result, so I decided to experiment with a few other images and incorporate them into cards.  The red twill is Creative Impressions 1/2" Red Blank Twill and the hearts are their Antique Copper Country Heart paper fasteners.


I stamped Annie Oakley onto the cork paper.  The detail showed up really well!  I carefully tore around the edges of the image and adhered to multiple card stock and patterned paper panels.  To really make the card stand out, I used Creative Impressions Natural Thin Twine wrapped around the first panel, an Antique Copper Primitive Star brad and a piece of the Happy Trails Twill to finish it up!

Now I decided to try using the cork paper as a card layer.  I certainly wasn't disappointed!  I stamped the Buffalo Bill Cody stamp I previously stamped directly onto the cork paper on a piece of scrap cream card stock this time and colored the image with Distress inks.  The cork paper was carefully torn around the edges and became a layer.  Love the look!


To finish the card, I stamped a B Line Designs small Rustic Star onto the cork paper and cut it out with scissors.  I punched a hole through the center of the star and adhered a Creative Impressions Large Copper Round, going through the image and red card stock layer as well.  To finish, I adhered 3 small Copper Mini Rounds to the red card stock and adhered the panel to the cork layer previously adhered to a blue card stock panel, patterned paper and finally a cream card.  Here is a close-up of the star.


Hope you have enjoyed these samples!  Head on over to www.creativeimpressions.com to purchase some of this fabulous paper - then  have fun creating your own cards and mixed media pieces!

Susan

Tuesday, June 13, 2017

B Line Designs and Creative Impressions Trunk Show at Artsy Stamps and Paper Crafts!

I believe it has been a while since I last posted!  I guess I was just too busy getting ready for a combination trunk show for the month of June at Artsy Stamps and Paper Crafts in Loveland, Colorado featuring B Line Designs stamps and Creative Impressions embellishments.   The show was kicked off on June 2nd through the 5th with three days of non-stop classes, make n takes and demos.  I was on hand along with my fellow designer for B Line, Michelle Bodensteiner, and Janet Romsos, the owner of Creative Impressions.

Here are a few pictures from the weekend:


Patsy Kral is the owner of Artsy.

Some of the B Line Designs displays that Michelle put together:


I had to share this photo of my friend, Donna.  She loves B Line Designs' stamps so much that she has her own notebook with the B Line catalog and supplements!


Here is the grand prize "trunk" made by Michelle that will be awarded to one lucky winner at the end of the show!  It is full of B Line stamps, Creative Impressions Embellishments and other wonderful goodies donated by Artsy!


Some photos from the Creative Impressions display:


Janet, the owner of Creative Impressions, and Patsy, owner of Artsy:


Finally, a few samples of demos and make and takes:

Ribbon Rose demo:


I turned one of the rose into a lollipop!


One of my favorite B Line Designs sentiments paired with Creative Impressions ribbon and Leafy Vine Trim:


The Pocket Gift Card Holder Make and Take using G45 Midnight Masquerade paper and Creative Impressions Blossoms:


The last make and take was creating a flower using Creative Impressions Blossoms - perfect for a card or for use as a pin, beret, gift package embellishment, etc.  The possibilities are endless!


One of the door prize winners:


What a fun long weekend!  If you find yourself in the area, head on over to Loveland, Colorado and Artsy Stamps and Paper Crafts!  All the goodies will be there until the 25th of June!

Happy crafting,
Susan