Saturday, October 25, 2014

Colored Crackle Halloween

Challenge Number 14 for the Compendium of Curiosities Challenge has arrived!  This time we are having fun with the Colored Crackle technique found on Page 53 of Tim's Compendium of Curiosities III book.  Still don't have the book?  Not to worry - it's never too late to join the fun!  Purchase the book here and play along!

The idea came to me for this challenge as a Halloween project.  I have seen so many awesome projects and decided that I didn't want to be left out, so here I am getting it done just before Halloween!  Here it is:


I used Tim's Crescent Moon and Stars die which I cut from cardboard.  The colored crackle technique was then applied.   I think this technique worked perfectly for the Halloween Moon!

Now, I would like to says 'thanks" to Tim for making me get a little crazy with color!  In the past I would have played it a bit more conservative  and used more subdued colors.  To show you what I mean, here is the tag I used alongside another tag with lighter colors.  I used the painted marble technique for both of them.


The one on the left just screamed "Halloween" to me, so I finally decided to go wild and use it.

I used the witch and spider stamps from Tim's Carved Halloween CMS 197 stamp set along with the                    die cut, letters to create the word "spooky" from the Tim Holtz Alterations Upon a Time alphabet strip and the number 31 from the Alpha Parts.  The Colored Crackle technique was applied to the moon and the stars.  This is what I ended up with:


Here is a close up of the colored crackle:


I think this technique worked perfectly!  The stars now have a bit of an "icy" look to them and the moon is definitely a bit spooky looking too.

After stamping the witch twice on scrap cardstock, I colored the image using Distress inks which I applied with a watercolor technique.  I then cut apart the back of the broom and jack-o-lantern, applied pop dots to the back and adhered them over the first image to create a bit of dimension.

The Alpha parts were colored with a bit of Spiced Marmalade paint and were adhered to the bottom of the tag!  I then adhered the rest of the elements to the tag.  To finish, I used Rusty Hinge and Mustard Seed Distress Stains to dye Tim's Crinkle Ribbon, made a bow and attached to the top!

Here again is the finished piece:


This challenge is being generously sponsored by the Funky Junkie Boutique.  One lucky randomly chosen winner will earn a $25.00 gift certificate.  Tim and Mario are also supplying another fabulous prize package for the winner of the Curiosity Crew Choice.  Good luck to everyone!  We really enjoy seeing all of your wonderful projects!  Thank you so much for participating!

Susan

Saturday, October 11, 2014

Worn Cover Quote Book

Can't believe we have arrived at the 13th Challenge!  I hope all of you have been enjoying these CC3 Challenges as much as I have!

This week we are using Tim's Worn Cover.  The technique can be found on Page 35 of his Compendium of Curiosities III book.  Remember, it's still not too late to get your autographed copy of the book here.

Our sponsor this week is The Inspiration Emporium.  They are once again providing a $50.00 certificate to a randomly selected winner!  Tim has yet another super prize package for the Curiosity Crew's Choice as well.

Not sure about the rules?  To be sure, head on over to our lovely hostess's website, Linda Ledbetter, to study them and learn how to create a project to share with us.  

Here is my project using the Worn Cover:


This is the front cover.  I began by cutting a label for the front cover using a Sizzix die (Frame Back, Ornate #3).  I added color to the label by blending in Antique Linen and Frayed Burlap Distress Inks.  This frame was then adhered to the front cover.

I decided I wanted an album to store all the quotes I have been collecting, so I used Tim's Sizzix Alterations Block Talk lower case alphabet and die cut the letters for the word "quotes" out of chipboard.  I then painted the letters with Aged Mahogany Distress Paint and adhered them to the center of the label.

To finish the front, I adhered butterflies from the Thrift Shop Ephemera Pack which were lightly watercolored with Aged Mahogany and Scattered Straw Distress inks above and below the word "quotes".  I just HAD to use two Word Bands (I love them!) that were perfect, "Collections" and "Encourage Your Hopes Not Your Fears" which I had previously painted with Aged Mahogany Paint and then wiped off, allowing the paint to remain in the recesses of the letters.  I added two brads for each Word Band and adhered both to the front, above and below the label die.

Finally, I adhered a Custom Knob to the front using a clock face.

I then proceeded to alter the inside of the worn covers as follows:


I started by using Tim's Burlap Texture Stencil and one of my new favorite paint colors, Aged Mahogany.  I randomly added paint through the stencil directly to the cover, carefully picked up the stencil and let the paint dry.

Once the paint was dry, I added a decorative paper panel to each inside cover.  Both are from the fabulous Wallflower Paper Stash.  On one side I stamped the Stampers Anonymous Butterflies and Moths 1 image using Wendy Vecchi's Potting Soil Archival ink.  I then lightly watercolored a bit of Scattered Straw Distress Ink onto the wings.

The second paper panel is from the same paper stash.  I stamped Stamper's Anonymous "Be Confident, Find Your Wings and Fly" towards the bottom of the panel.  I added this beautiful bird from the Thrift Shop Ephemera Pack to the upper right of the panel.

I carefully tore around the edges of both panels and finished them by adding some Walnut Stain Distress Ink to the edges.  The panels were then adhered to the inside covers of the album along with some greenery die cut from the Spring Greenery die and colored with Peeled Paint and Vintage Photo Distress inks.

I used some wonderful words from the Life Quotes Remnant rubs in various places on the covers.  Finally, I added a metal butterfly from the Adornments Nature collection which was previously painted with Scattered straw and Aged Mahogany to the right hand panel.

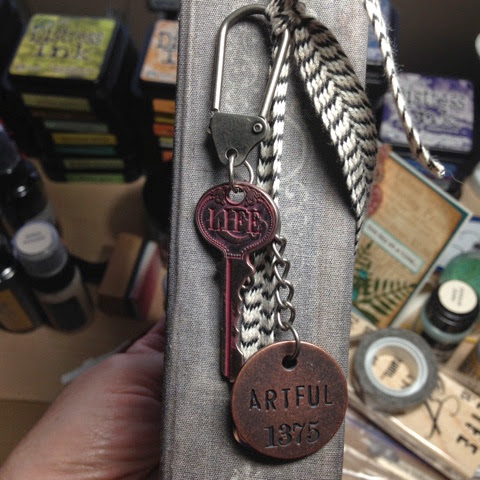
The final touch was adding the Ring Binder to the inside of the Worn Cover by threading a Black and White Natural Trimming over the Ring Binder and through the holes in the cover to the front spine.  I tied a knot and clipped the ends of the trimming.  To finish off the project I used a Swivel Fastener  which I added to the trim knot and placed a Word Key and Philosophy Tag at the clip end and chain end.
Here are close-ups of the inside covers:


Finally, the Book spine:

Hope you like this project and are inspired to create your own Worn Cover!  You will eventually be adding pages to this album which can be used for a number of purposes such as a photo album of quote book!  Use your imagination - the sky's the limit!

Have fun!  Susan