Tuesday, June 12, 2018

Butterfly Birthday Wishes

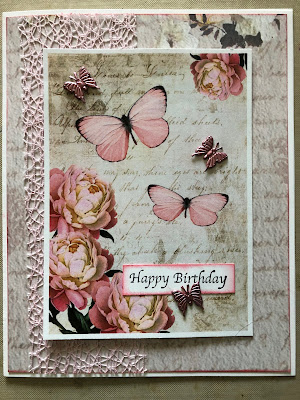
Happy Tuesday Everyone!  Today I am featuring a simple card made with Creative Impressions embellishments along with Fab Scraps and Stamp Doctor beautiful papers!


The butterfly images are from a sheet by Stamp Doctor.  I layered this main image onto a panel with patterned paper and Creative Impressions Pink Web.  I think the background paper created a softness to the card and the Web added texture.


The panel was adhered to a folded card.  Then I added 3 Creative Impressions Metallic Butterflies to the main panel for some interest.


The panel was adhered to the base card:


Finally, I added a bow at the bottom created with Creative Impressions Crepe Ribbon.  Here is the finished card once again:


Hope you like this sweet card with lots of butterfly wishes!
Happy creating!
Susan

Wednesday, March 21, 2018

From Ordinary to Awesome: An Artistic Transformation

Hello Everyone!  I would like to share with you an incredible group project inspired by the creative genius of my friend, Michelle Bodensteiner.  It goes like this:

What can you do with an Idea Market Paris Jewelry Stand?


Well,  when 5 other artistic ladies trust in Michelle's vision, you get this:


And this:

And this:
And this:

And even this:


And finally this:

Aren't these projects amazing!  Michelle took one look at the original jewelry stand and immediately knew what could be created for each person in the group.

Each person had a theme in mind for their project.  Michelle is known for her beautiful paper doll creations, so she pulled out some doll ideas and went to work.  All of them turned out so incredibly beautiful.

First off, here is a photo of Michelle's finished project.  She created hers along with a Santos Doll that   was dedicated to the women in her family who were seamstresses.   Michelle chose to keep the hanger exposed and to use it as a wardrobe for the lovely paper doll dresses. 


Michelle has a vintage family photo of these women wearing their own creations.

Next is my project.  I wanted to create a Whimsical Garden:


My stand is two-sided and features several birdhouses and multiple paper dolls.  I love it!

Here is a similar project created by Nancy Brooks.  She also used several birdhouses.


You may be wondering how Nancy and I managed to get the large birdhouse in the center around the main pole....Michelle to the rescue!  She had a friend who was able to cut the bird houses in half.  Then we glued them back together around the center pole:


Next is Marsha Franz's project.  She wanted to create a Fairy Garden.  Notice the center tree structure which becomes almost 3-dimensional double-sided.  That was the inspiration to add the branches for the fairy forest.


Now for Sandy Beck's project.  Sandy's father and grandfather both worked for the Singer Sewing Machine Company, so she wanted to create a project dedicated to them and using some of the keepsakes she had.  The inspiration for this project was her button collection which was adhered to the hanger portion of the jewelry stand.


Michelle also helped Sandy cover the lovely hatbox and helped her create the folio made for family photos.

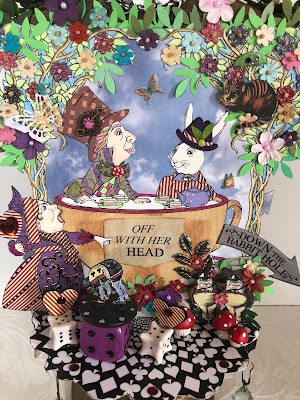
Finally, Diane Martell loves Alice in Wonderland.  Michelle had her work cut out for her designing this project!


So much detail in the Mad Hatter's Tea Party!

Hope you enjoyed the photos and descriptions of our wonderful projects.  Don't forget to take a good look at the "Ordinary" and turn it into something "Amazing!

Susan


Wednesday, January 31, 2018

Congratulations to Simple Pleasures!

I just had to blog about Simple Pleasures' upcoming 23rd Anniversary!  Simple Pleasures is a fabulous Rubber Stamp and Scrapbook store located in Colorado Springs, Colorado.  Cathy Smith, the owner, stocks just about whatever supplies you could possibly want, including Mixed Media products, a wide variety of scrapbook papers, stencils, including all Memory Box, dies and more!


When you first walk into the store and go to the right, you will find one of the biggest selections of Planners I have ever seen!


And then there are the papers!  Cathy carries all the Graphic 45 papers, along with every brand you can imagine, including Disney!


Here is the Graphic 45 Staples display:


And the huge Memory Box die and stencil Display:


Just when you think you have seen it all, here is the Ribbon Wall!


Dies from Tim Holtz, Impression Obsession and many more:


Cathy offers a wide variety of classes and brings in wonderful Guest Teachers.  Here is her spacious classroom:


Of course there is much more to see!  Cathy's big celebration for her 23rd Anniversary is in a few weeks.  If you can make it to Colorado Springs, it would definitely be a treat not to miss!

Congratulations again, Cathy!

Susan

Tuesday, January 23, 2018

MARDI GRAS!

Hello Everyone!  This year Ash Wednesday falls on Valentine's Day, so guess what day Tuesday, the 13th is, Fat Tuesday, or Mardi Gras!  Has anyone thought how much fun it would be to create some fun cards to send out "just because" to friends and family?  I sure did.  Here they are:


I love Creative Impressions embellishments joined with Graphic 45 papers!  I still have a stash of G45's Midnight Masquerade paper that I wanted to use just for this theme.  Love the combination.  Of course, I thought the embellishments that really "made" these two cards were the Velvet Shimmer Ribbons 70971 Orange and 70978 Lavender  and especially these wonderful Yellow 90602 Fleur-di-Lis paper fasteners/brads!  Don't they make you immediately think of New Orleans and Fat Tuesday?


Here are some close ups for detail:


For this first card, I created a border using one of my border punches and a matching shade of orange cardstock.  I then layered on one of the G45 papers in the collection after first wrapping Creative Impressions Orange Velvet Shimmer Ribbon around each side edge.  Then I punched three holes on each side with a paper awl and inserted the Yellow Fleur-di-Lis brads.  What a difference!  I cut out some masks separately from the paper and used foam tape to adhere them to a black panel.  I could not resist adding some Orange Stickles to the bottom border as well.  Here is the card without the brads:


See what I mean?  It is still pretty but it really "pops" with the addition of the brads!

Of course, I think some feathers coming out from behind the masks would have really added some "punch", however, I am allergic to feathers, so alas....disappointing.

Now for some detail on the second card:


I cut an extra of the costumed character from another panel as well as the larger flowers and adhered them over the top of the bottom images using foam tape.  I used some Orange and Purple (Starry Night)  Stickles to accentuate the mask and part of the pattern of the clothes.  Matches the beautiful Creative Impressions Purple Velvet Shimmer ribbon well!  I added some White Pearls from Creative Impressions to the flower centers and, after wrapping the panel on the left side with the ribbon, I adhered all to a second G45 panel and finally to the card.


Hope you have enjoyed these Mardi Gras themed cards.  Hope they make you think of New Orleans and maybe even Brazil and Carnival!  Party on!

Susan