I decided to create a fat tag using one of my all time favorite B Line Designs stamps, Dream Catcher. The stamp has a background, however, I decided to cut her away from the background after coloring her with Prisma Color pencils and paint my own sky instead.
I incorporated one of my favorite techniques, Paint Marbling. If you don't know how to do this technique, you can find it on Page 43 of Tim Holtz's Compendium of Curiosities Volume III book.
I used four colors of Distress Paint, Blueprint Sketch, Stormy Sky, Weathered Wood and Picket Fence and added a bit of each color to a craft sheet. Then I spritzed the whole thing with water and ran my tag through the paint, swirling it as I went. I dried it with a heat tool and then ran it through the paint again. Love the way this turned out!
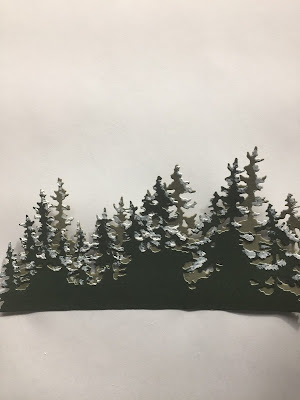
Since I'm from Colorado, I wanted to add some evergreen trees to the background behind my girl. I used a Thinlits evergreen border die by Tim Holtz Alterations for Sizzix. I die cut the border twice, once in a dark green and the second one in a lighter green. Then I adhered the two together, slightly off-setting them to add dimension.
Next I added some gesso to the edges of the trees to look like snow.
Of course I needed a mound of snow for the little girl to stand on. I took a scrap of white card stock and cut it in a curved fashion, then cut the edges to fit the tag. I adhered my snow mound to the tag using foam tape.
I stamped just the snow mound from the Dream Catcher stamp, cut it out and adhered it to my larger snow mound cut from scrap card stock. Foam tape was adhered to the upper part of the girl for dimension. I left the lower part of her legs free and used matte medium to adhere her boots and pantaloons to the snow mound.
At this point she needs some snowflakes to catch. I die cut some small snowflakes from Cheery Lynn's Snowflake die using white glitter card stock. I then adhered the snowflakes randomly onto the tag. At the same time, I created a loop and bow using one of my favorite ribbons from Creative Impressions, the white glitter ribbon.
I used gesso to add some snow texture around the edges of both of my snow mounds and sprinkled some Clear Rock Candy Distress Glitter over the top while it was still wet. To finish the piece, I added a slightly larger snowflake to the snow mound for interest as well as a purple felt Snowflake from Creative Impressions and a die cut snowflake over the top. Here is a close up of the finished piece.
And once again here is the entire piece. Note that I created a black card stock mat for the back of the tag.
I hope you have enjoyed my Winter tag and that it inspires you to go out and catch a few snowflakes of your own!
We are all enjoying your projects for "Baby, It's Cold Outside!" here at Creative Carte Blanche! Hope to see lots more!
Susan


Susan, we have had plenty to be miserable about here in the UK, with rain, rain and more rain... but, we might be lucky tonight and get some real snow - fingers crossed. Perhaps we could do a swap - lol.
ReplyDeleteGreat use of the stamp, the girl looks like she belongs in your scene, catching those beautiful snowflakes. I love how the background turned out and the snow on the trees looks so good! I am looking forward to joining in this one! Anne xx
This is such a sweet use of this image, Susan! I love these colors. Wintery and yet very cheerful. I love your tag!!
ReplyDeleteThanks so much, Cheryl! Appreciate it!
DeleteSusan...this tag is darling and loaded with lots of lovely layers and detail! I love your trees!!! So pretty with their snowy branches in the background. Love your snowflakes drifting into your darling little girl's hands!
ReplyDeleteThanks so much, Candy! Appreciate it!
Delete