Saturday, October 25, 2014

Colored Crackle Halloween

Challenge Number 14 for the Compendium of Curiosities Challenge has arrived!  This time we are having fun with the Colored Crackle technique found on Page 53 of Tim's Compendium of Curiosities III book.  Still don't have the book?  Not to worry - it's never too late to join the fun!  Purchase the book here and play along!

The idea came to me for this challenge as a Halloween project.  I have seen so many awesome projects and decided that I didn't want to be left out, so here I am getting it done just before Halloween!  Here it is:


I used Tim's Crescent Moon and Stars die which I cut from cardboard.  The colored crackle technique was then applied.   I think this technique worked perfectly for the Halloween Moon!

Now, I would like to says 'thanks" to Tim for making me get a little crazy with color!  In the past I would have played it a bit more conservative  and used more subdued colors.  To show you what I mean, here is the tag I used alongside another tag with lighter colors.  I used the painted marble technique for both of them.


The one on the left just screamed "Halloween" to me, so I finally decided to go wild and use it.

I used the witch and spider stamps from Tim's Carved Halloween CMS 197 stamp set along with the                    die cut, letters to create the word "spooky" from the Tim Holtz Alterations Upon a Time alphabet strip and the number 31 from the Alpha Parts.  The Colored Crackle technique was applied to the moon and the stars.  This is what I ended up with:


Here is a close up of the colored crackle:


I think this technique worked perfectly!  The stars now have a bit of an "icy" look to them and the moon is definitely a bit spooky looking too.

After stamping the witch twice on scrap cardstock, I colored the image using Distress inks which I applied with a watercolor technique.  I then cut apart the back of the broom and jack-o-lantern, applied pop dots to the back and adhered them over the first image to create a bit of dimension.

The Alpha parts were colored with a bit of Spiced Marmalade paint and were adhered to the bottom of the tag!  I then adhered the rest of the elements to the tag.  To finish, I used Rusty Hinge and Mustard Seed Distress Stains to dye Tim's Crinkle Ribbon, made a bow and attached to the top!

Here again is the finished piece:


This challenge is being generously sponsored by the Funky Junkie Boutique.  One lucky randomly chosen winner will earn a $25.00 gift certificate.  Tim and Mario are also supplying another fabulous prize package for the winner of the Curiosity Crew Choice.  Good luck to everyone!  We really enjoy seeing all of your wonderful projects!  Thank you so much for participating!

Susan

Saturday, October 11, 2014

Worn Cover Quote Book

Can't believe we have arrived at the 13th Challenge!  I hope all of you have been enjoying these CC3 Challenges as much as I have!

This week we are using Tim's Worn Cover.  The technique can be found on Page 35 of his Compendium of Curiosities III book.  Remember, it's still not too late to get your autographed copy of the book here.

Our sponsor this week is The Inspiration Emporium.  They are once again providing a $50.00 certificate to a randomly selected winner!  Tim has yet another super prize package for the Curiosity Crew's Choice as well.

Not sure about the rules?  To be sure, head on over to our lovely hostess's website, Linda Ledbetter, to study them and learn how to create a project to share with us.  

Here is my project using the Worn Cover:


This is the front cover.  I began by cutting a label for the front cover using a Sizzix die (Frame Back, Ornate #3).  I added color to the label by blending in Antique Linen and Frayed Burlap Distress Inks.  This frame was then adhered to the front cover.

I decided I wanted an album to store all the quotes I have been collecting, so I used Tim's Sizzix Alterations Block Talk lower case alphabet and die cut the letters for the word "quotes" out of chipboard.  I then painted the letters with Aged Mahogany Distress Paint and adhered them to the center of the label.

To finish the front, I adhered butterflies from the Thrift Shop Ephemera Pack which were lightly watercolored with Aged Mahogany and Scattered Straw Distress inks above and below the word "quotes".  I just HAD to use two Word Bands (I love them!) that were perfect, "Collections" and "Encourage Your Hopes Not Your Fears" which I had previously painted with Aged Mahogany Paint and then wiped off, allowing the paint to remain in the recesses of the letters.  I added two brads for each Word Band and adhered both to the front, above and below the label die.

Finally, I adhered a Custom Knob to the front using a clock face.

I then proceeded to alter the inside of the worn covers as follows:


I started by using Tim's Burlap Texture Stencil and one of my new favorite paint colors, Aged Mahogany.  I randomly added paint through the stencil directly to the cover, carefully picked up the stencil and let the paint dry.

Once the paint was dry, I added a decorative paper panel to each inside cover.  Both are from the fabulous Wallflower Paper Stash.  On one side I stamped the Stampers Anonymous Butterflies and Moths 1 image using Wendy Vecchi's Potting Soil Archival ink.  I then lightly watercolored a bit of Scattered Straw Distress Ink onto the wings.

The second paper panel is from the same paper stash.  I stamped Stamper's Anonymous "Be Confident, Find Your Wings and Fly" towards the bottom of the panel.  I added this beautiful bird from the Thrift Shop Ephemera Pack to the upper right of the panel.

I carefully tore around the edges of both panels and finished them by adding some Walnut Stain Distress Ink to the edges.  The panels were then adhered to the inside covers of the album along with some greenery die cut from the Spring Greenery die and colored with Peeled Paint and Vintage Photo Distress inks.

I used some wonderful words from the Life Quotes Remnant rubs in various places on the covers.  Finally, I added a metal butterfly from the Adornments Nature collection which was previously painted with Scattered straw and Aged Mahogany to the right hand panel.

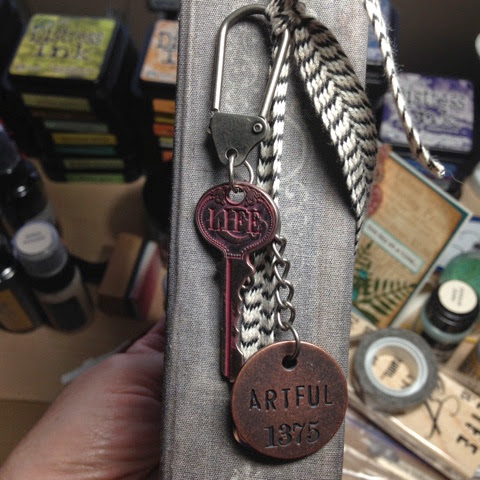
The final touch was adding the Ring Binder to the inside of the Worn Cover by threading a Black and White Natural Trimming over the Ring Binder and through the holes in the cover to the front spine.  I tied a knot and clipped the ends of the trimming.  To finish off the project I used a Swivel Fastener  which I added to the trim knot and placed a Word Key and Philosophy Tag at the clip end and chain end.
Here are close-ups of the inside covers:


Finally, the Book spine:

Hope you like this project and are inspired to create your own Worn Cover!  You will eventually be adding pages to this album which can be used for a number of purposes such as a photo album of quote book!  Use your imagination - the sky's the limit!

Have fun!  Susan

Saturday, September 27, 2014

Vintage Photo Tinting

Whether you are incorporating vintage photos into your artwork or would like to colorize some of those treasured old photos, this technique is for you!  Turn to Page 41 of Tim Holtz's Compendium of Curiosities III book, learn the technique and join us for this challenge!

If this is your first time joining us or you would like to review all the challenge rules, please head on over to Linda Ledbetter's site (our fabulous hostess) to familiarize yourself with the rules.  This week's challenge (Number 12, can you believe it?) is sponsored by the generous folks at The Funkie Junkie Boutique.  Tim and Mario also have yet another wonderful prize waiting for the winner of this challenge!

Here is my project:
I decided to use a photo of my mother when she was 2 years old.  (She is 85 now).  After following the tehnique on page 41, I then placed the photo in one of Tim's Cabinet Cards.

I didn't want to detract from the photo too much by getting carried away with embellishments, so I used a minimal number which I think accented the photo just right.  I started by placing two strips of scalloped trim from Tim's Industrious Stickers, Frames and Trims set on the top and bottom of the photo.  I then added some Tissue Tape - Elements to one side of the card (I love this one as it reminded me a bit of a growth chart). 

I spelled out M O M with Tim's Alpha Tiles Chipboard Letters tiles and adhered them directly to the photo.  The final embellishment was the lovely metal rose and leaf from the Idea-ology Adornments Nature.  I used Aged Mahogany and Peeled Paint Distress Paints to add color.  The last touch to the photo itself was to dye  thin fiber with Aged Mahogany Distress Paint, tie a small bow and adhere at the top of the letter "O".  Here is a close up:
Lastly, I used one of my all time favorite Idea-ology accents, a word band on the bottom of the card that says " Know in Your Heart that You are Loved.  Before adhering it to the card, I threaded through some Crinkle Ribbon which I had previously dyed with Aged Mahogany Distress Paint.  I was so thrilled that I could match the color I used in the bench my mother is sitting on with the rose, the fiber bow and the crinkle ribbon!  What fun!

The stamp I used as part of the tinting technique is from Stamper's Anonymous.  I think it fits perfectly and is a wonderful reminder to never stop playing!  

I hope my project will inspire all of you to pull out those vintage photos of  your family or look for "found" relatives to incorporate into your artwork.  All of us at the Curiosity Crew look forward to seeing all your beautiful and inspirational pieces!

Susan


Saturday, September 13, 2014

Delightful Distress Effect Powders!

As I am currently traveling with my mother in her home state of Washington, I must confess to getting this blog post in right under the wire for the announcement of the latest CC3C challenge, Distress Effect Powders.  However, I certainly was not going to be left behind on this challenge as I was really excited about participating in this fun one!  I finished my project before I left.  Here it is:
Here's another confession...Can you all believe I have owned Tim's fabulous hot air balloon stamp for awhile and I hadn't used it yet!  I know, I know!  I do believe I am hearing audible gasps right now!

Well, I was playing with stamps and saw my Fabulous Flourishes stamp set.  I thought it would be fun to put the Fabulous Flourishes with the Hot Air Balloon, which, in my imagination, created a "time machine".  Thus, the theme for my tag was born!

I started by stamping and embossing the Fabulous Flourish with Verdigris powder onto paper from Tim's Destinations Paper Stash cut into a tag shape.  I then stamped the Hot Air Balloon over the flourish and again onto a piece of scrap cream cardstock and watercolored it with Distress Inks.  Using a stamp positioner, I lined up the Fabulous Flourish onto the balloon and then cut apart the balloon and the basket from the stamped image.  I used foam tape to adhere the balloon and basket over the top of the stamped image on the tag.

I had some lovely thin fibers that I decided to adhere to the balloon to accent the "ropes."  I adhered them all using Matte Medium.  I finished off the hot air balloon by adhering the flag attached to the basket with foam tape..

The three gents is truly one of my favorite stamps and I knew they would work well with my Time Machine theme, so I stamped them on a separate piece of cream cardstock, colored with Distress Inks and cut out.  Once again I used foam tape to adhere the image below the hot air balloon.

This piece would not be complete without the use of my favorite Ideology.  I dyed some Crinkle Ribbon with several colors of Distress Stain and placed a finished bow I created at the top of the tag, placing a Custom Fastener with the word Traveller in the center.  I also added a sproket gear to the center of the balloon along with a game spinner and as Chit Chat Stickers that spell "Journey Through Time".  The last accent piece was a word band with embossed Verdigris powders around the edges.
To complete this project, I used the technique described on Page 52 to create a "rusted" look around the edges of the tag.  I used Vintage Photo Distress Powder.  I was pleased at how well this technique finished off the project.  Lastly I adhered the entire tag over a black tag.

The  gift certificate for this challenge is generously provided by Inspiration Emporium to one lucky randomly selected winner and the creator of the winning CC3C judge's choice project will receive a fabulous prize package from Tim and Mario.  Another big thank you to them for providing these incredible prizes!

Good luck to everyone
Susan

Saturday, August 30, 2014

Compendium of Curiosities Challenge 10-Assemblage Clock

I can't believe we have already reached the 10th challenge!  I have had so much fun with all the challenges, but I have especially been looking forward to this one!  The minute I saw this wonderful Tim Holtz Assemblage Clock just waiting to be filled with something fun and the technique on Page 33, I knew exactly what I was going to do!  Here it is:
I wanted to put this photo of my Great Aunt into a nest and this clock gave me the perfect opportunity. Isn't she sweet?  I decided she needed a little rose in her clasped hands and sheer fairy wings.  

I started by removing the alarm bells and handle so that it would be easier to paint.  I had been warned by my fellow member of the Curiosity Crew and friend Marjie Kemper that it was real glass on the front, so I needed to be very careful.  I thought I would use painters tape to cover the glass.  Problem solved and I didn't need to take the whole clock apart!  

I then applied three coats of gesso to the clock and bells as a base and followed with Bundled Sage Distress Paint.  After the paint was dry, I used a rag to apply some streaks of color using Gathered Twigs, Peeled Paint and Shaded Lilac.  Once dry, I reassembled the clock.

This is what the clock looked like while it was being painted:

Now the real fun began when I could decorate the inside of the clock!  

The first thing I did was to trace the back of the clock onto some of Tim's fabulous Wallflower paper and then cut it out.  I adhered it to the clock back using Scor-tape.

I had a nest that was slightly too big for the clock, so I cut it in half and inserted this half nest into the clock.  First I adhered down some excelsior moss and then the nest.  I added some more excelsior inside the nest and then placed the photot of my sweet Aunt Nita that I had decorated earlier inside the nest.  I had some silk flowers that I thought would look nice around the nest, so I adhered them around the nest to add color and interest.

I closed up the back of the clock and set to work on decorating the outside of the clock.  I just knew I had to use some of Tim's Ideology Nature Adornments.  The bough and the flying bird were perfect!  I painted both of them using the same Distress Paints I used to paint the clock.  I found the Word "Special Delivery" in Tim's Ideology Paper Pack and decided to cut it in two so that I had one word I could adhere to each "bell" of the assemblage clock.

The last thing I added were the words "loves" and "adventure" which are from Tim's Remnant Rubs.  Here is a close-up of the inside design:
I truly hope you have as much fun with this challenge as I did!

This 10th challenge is sponsored by the generous folks over at the Funkie Junkie Boutique.  There is also another fabulous prize package from Tim and Mario waiting to be shipped to one lucky winner!  Head on over to LindaLedbetter's site for all challenge rules and links to all the Curiosity Crew's blogs.  Don't forget to leave a comment!

Hope you enjoy this challenge!
Susan

Saturday, August 16, 2014

Stamps and Framelits (and Family)

They're BAACK!  Yes, some of you have commented that you would like to see more projects done combining Tim's fabulous techniques with my family photos and stories.  After taking a break from using my photographs last week and instead using Tim's Three Gentleman (love that stamp!), who anyone can claim as relatives, I decided to use a beloved photo of my grandparents (my Dad's parents) on their wedding day for this ninth challenge. Here it is:
For this Stamps and Framelits challenge, I used Tim's wonderful French Flight set which includes Paris scenes as well as the butterflies we all know and love!

My grandparents had very little money when they were married.  Belle and Irvin met in Devil's Lake, North Dakota and instantly fell in love.  Grandpa traveled for work logging, harvesting wheat, etc. eventually settling in Bellingham, Washington, quite aways from North Dakota.  They exchanged love letters which I was thrilled to inherit in which Grandpa always called Grandma "Sweetheart"  He was determined to marry her and worked hard to save $50.00 to send her for the train fare to come out to Bellingham and marry him!  She got on that train and never saw her parents again (that part I find so sad)

As they had very little money, they had a simple wedding.  This photo was taken in front of a house.  I decided to create a canvas of a place where I imagine they would have loved to have been married and honeymooned, Paris...

I used a small white canvas as a base and colored it, using Antique Linen, Victorian Velvet and Shaded Lilac Distress Paints slightly watered down to paint the canvas.  I wanted a pastel, soft, romantic background and these colors worked well together.

I then found and printed out the sheet music to the song "Let me Call You Sweetheart" which seemed appropriate for this piece.  I tore around the edges and adhered it to the canvas with Matte Medium and more Distress Paints.  I wrapped some of Tim's Music Tissue Tape around the bottom on the canvas and painted it as well.

Following the technique found on Page 63 of Tim's Compendim of Curiosities III book, I stamped and cut out the Eiffel Tower and Paris signs, colored them and added them to my collage long with some wonderful Ideology pieces, including the Word Band and Word Key which I colored using the Shaded Lilac Distress Paint.  One of my favorite pieces is this adornment I created  from a length of Trimming,  an Accoutrements Fanciful Button and a Bauble placed in the top left corner.  Here is a close up:
I also used the Heart Charm and the Plaquette with the number 17 representing my father's birthday.  I used the  Stampers Anonymous Tiny Words stamp, stamping it directly onto tissue paper and cutting the words apart.  I then adhered my chosen words to the canvas with matte medium and, once dry, drew around them with Victorian Velvet and Shaded Lilac Distress Markers.

Hope you all have fun playing with Stamps and Framelits!  I sure did!  This 9th challenge is generously sponsored by The Inspiration Emporium who is providing a $50.00 gift certificate to a lucky random winner and, of course, by the fabulous Tim and Mario, who will be providing the wonderful package of goodies to the Curiosity Crew Choice winner!  Good luck to everyone.

Just joining us?  Head on over to Linda Ledbetter's blog where you can find all the information you need to play along with us, including how to get your very own autographed copy of the Tim's book and all the contest rules.  Upload your creation based on the technique and enjoy viewing the wonderful projects made by so many talented people!  

Thanks for joining us!
Susan

Saturday, August 2, 2014

Fun with Faded Layers

Here we are at the 8th challenge for the CC3C!  Hard to believe!  I am having so much fun exploring all these wonderful techniques from Tim's book!  How about you?  I am honored to be a member of the Curiosity Crew and I can tell you that we have SO enjoyed seeing your wonderful projects - you are all so incredibly talented!

Here is my project:
Am I hearing gasps from those of you who were expecting a project featuring one of my relatives?  Don't worry, they'll be back, just wanted to try something different. (no, these guys are not my relatives)

I started by cutting out an extra large tag from glossy cardstock and then followed the technique found on page 58 of the Compendium of Curiosities III book.  I love it!  I apologize that I forgot to take a picture of the tag before I got very far on it.  Here is a bit of a close-up so that hopefully you can see a bit of the final look that you get using this technique.
Can you see the letters?

Once I finished the technique, I die cut Tim's  Weathered Clock using a piece of Core'dinations cardstock and distressed it a bit with his sandpaper block.  I then adhered it to the tag along with several stamped images including the three gentlemen and the hand and writing fluid bottle which I colored and cut out from the Typography stamp set.  I stamped the alphabet from the same set along the bottom of the tag.

Next were the Ideology pieces (I am addicted to Ideaology!).  I used the Note to Self and Arrow from the Alpha Parts set, two pen nibs, one hinge clip, one wire pin and , of course, the wonderful word band.  I used Tim's Natural and Cream trimming to attach the word band.

I finished the piece with a ribbon bow that I created using Tim's crinkle ribbon colored with Rusty Hinge and Walnut Ink Distress Stains.  I added some chain and the Believe Philosophy Tag.  Here is the finshed piece once again:
I hope you have fun with this challenge.  This time it is sponsored by the wonderful folks at The Funkie Junkie Boutique who have a $25.00 gift certificate for one lucky recipient!  Hop on over to Linda Ledbetter's website for more information and to see all of the fabulous projects!

Happy crafting!
Susan